Millimeter: a millimeter is 1/32 or 0.039 of an inch. This is the default unit of measurement in Tinkercad. You can change this to inches by selecting the “edit grid” button on the bottom right. Pan: to move the virtual “camera” up, down, left or right in relation to the part you are viewing.
Does Tinkercad measure in inches?
We’ll want to work in inches for this project, so click Edit Grid in the bottom right of the Tinkercad window. You should get a pop-up with some options. Change Units to Inches. Click Update Grid.
How do you use the ruler tool in Tinkercad?
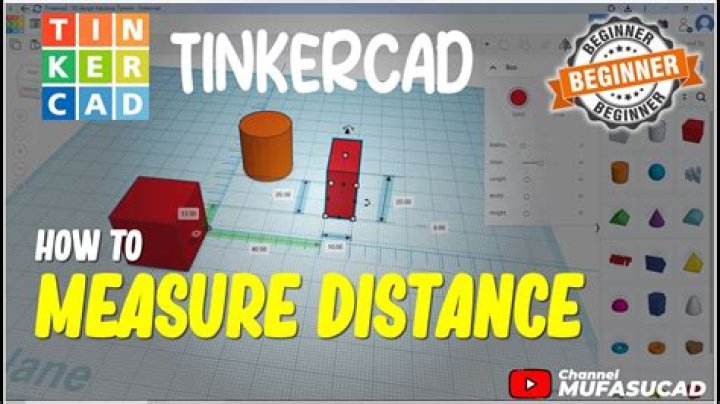
Press the R key and click anywhere on the workplane to place a ruler. With the ruler placed, click an object and you’ll see all of its dimensions displayed, as well as its relative position to the ruler.
Does TinkerCAD use inches or MM?
Millimeter: a millimeter is 1/32 or 0.039 of an inch. This is the default unit of measurement in Tinkercad. You can change this to inches by selecting the “edit grid” button on the bottom right.What is the default measurement of the Workplane in Tinkercad?
The default measurement of the workplane is 200 x 200. Tinkercad allows you to change the unit of measurement with the Edit grid button. Click on the drop down arrow of Units to switch to Millimeters / Inches.
What is the default measurement of the work plane?
Choose Units, and use the dropdown to change. The Presets menu allows you to change the size of the workplane. Default is 200×200 mm.
What does Hole mean in TinkerCAD?
A hole in TinkerCAD is a shape that when grouped with another object, will remove material instead of joining together. This is kind of like a hole punch. Everything in the path of the hole bunch will be removed. To create a hole, select an object and click the “Hole” button near the top right.
Can you edit shapes in Tinkercad?
If you want to know all the Tinkercad shortcut to make your designing experience more efficient, here is a blog post on all the shortcut! Step 1: Drag the shape you want to modify onto the workplane. Then drag another shape that you want to cut into your original shape. … A new shape will be created.What are 5 industries that 3D design is used in today?
- Architecture and Construction Industry. When it comes to architecture and construction, 3D printing is used to produce detailed models of buildings. …
- Aerospace/Aviation. …
- Medical/Healthcare Industry. …
- Entertainment. …
- Fashion Industry. …
- Transportation/Automotive. …
- Applications of 3D printing in different industries. …
- Conclusion.
- Import Model (max.25MB / STL, OBJ, SVG(2D))
- Add Cube or other shape to use for cutting.
- Scale the shape and position it.
- Change the shape to “hole”
- Select the shape and your model.
- Click Group.
- If you want to change something click “Ungroup”
- Export the model with “export”
How big is the grid on Tinkercad?
As you change the printer, you’ll see how the size of the grid changes accordingly. Now, when you use the grid as a workplane, we also wanted to differentiate it, so we kept the 200x200mm grid. Let us know what you think about it (and say thanks to Petr Broz and Darin Hughes for this feature if you see them around).
What is the use of the Edit Grid option in Tinkercad?
The “Edit grid” button in the bottom-right corner of the screen allows you to configure the workspace grid according to the size of various 3D printers or custom dimensions.
What tool would you use to add notes in Tinkercad?
All of this is now possible with Tinkercad’s 3D Notes tool. You can find this new addition above the Shapes menu, next to the Ruler and Workplane tools. As a shortcut, you can also use the letter N on your keyboard to place a note.
How do you set a scale in Tinkercad?
In Tinkercad, you can resize an object in any direction you like by dragging its corners. Unfortunately, you’ll also disrupt its proportions (your perfect circle is now an oval). By holding the shift key as you drag, the object will hold its proportions as it scales up and down in the direction you pull it.
How do you annotate in TinkerCAD?
You can think of annotation like sticky notes for your circuit. To create one, open a circuit design in the Tinkercad Circuits editor and click on the speech bubble icon in the top left menu bar. This same icon will appear in your design, and you can drag it to any element you’d like to annotate.